EMA Supply & Demand Zones: How to Trade & Automate EMA S&D
Rather than using the EMA as a trade signal, we use it to objectively define when market conditions have shifted, allowing us to draw new Demand zones only after a confirmed break in trend.
.webp)
Why Supply & Demand EMA Zones Matter in Automated Trading
Within Supply & Demand trading, price zones represent some of the clearest footprints of market imbalance and participation by large market players. These zones are not indicators, patterns, or subjective retail concepts — they are areas on the chart where supply or demand has clearly overwhelmed the opposite side, causing price to move away with strength.
You can also read the basic and full Supply & Demand zones explanation for a better insight in the Supply & Demand theory.
Using the Exponential Moving Average (EMA) to Define Trend Breaks and Demand Zones
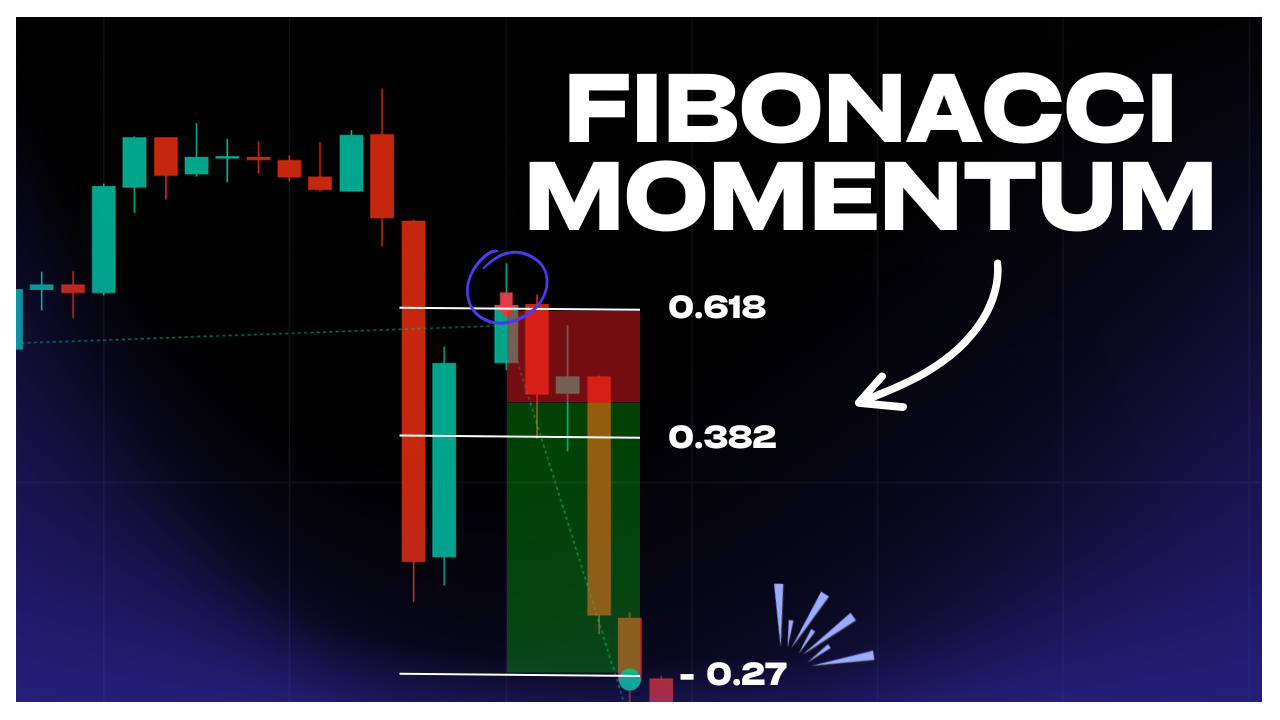
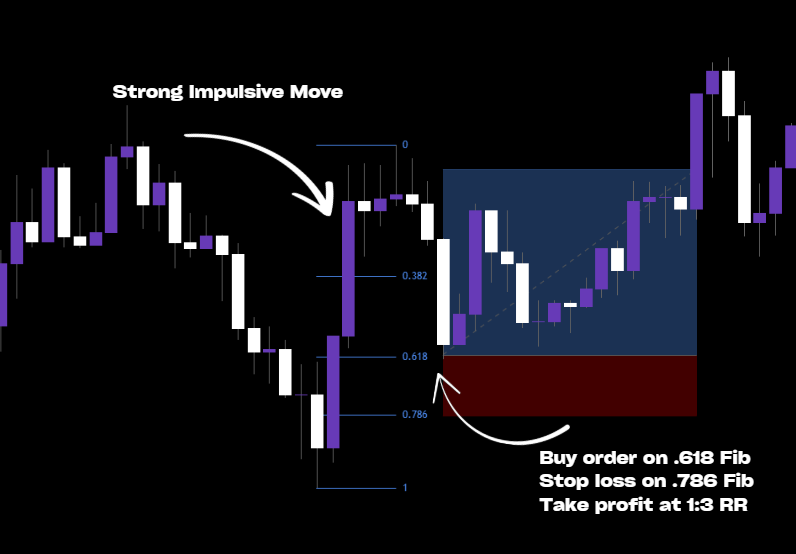
Traditional Supply & Demand zone trading focuses on identifying strong impulsive moves away from price levels. While effective and fully automated, this approach often leaves room for interpretation — especially when defining whether a trend has truly ended or merely paused.
To remove this ambiguity, we can introduce the Exponential Moving Average (EMA) as a trend filter and structural confirmation tool.
Rather than using the EMA as a trade signal, we use it to objectively define when market conditions have shifted, allowing us to draw new Demand zones only after a confirmed break in trend. When price breaks above the EMA, we can consider a change of trend and look for the Demand zone that was responsible for this break and change.
Since we focus on building automated trading systems for MetaTrader 5, we will refer to these systems as Expert Advisors (EAs) going forward. We’re also specifically focusing on Demand zones in this article
What is a Supply/Demand EMA Zone
A Supply or Demand zone is an area on the chart where the price moved away impulsively, indicating a strong imbalance between buyers and sellers. Supply & Demand zones are significant because they often act as:
- Areas of accumulation or distribution
- High-probability reaction zones
- Structural support or resistance
Instead of relying on an impulse candlestick pattern as we do for the basic S&D zone template, we use the EMA indicator to establish where a change of trend happened and use these areas as reliable reaction zones.
In this framework, the EMA acts as a dynamic equilibrium line. As long as the price respects the EMA, the prevailing trend remains intact. A decisive break through the EMA signals that market conditions may be changing.
This removes subjective trend interpretation and replaces it with rule-based validation.
Structurally, a Demand EMA zone is identified by:
- A clear break above the 50-period EMA
- Identify the last imbalance candle before the break of the EMA
- The last imbalance candle before the EMA break is not touching the EMA
These characteristics make this iteration of Demand zones objective zones of interest rather than subjective trade entries. However, on lower timeframes, when stacked with other confluences, Demand EMA zones can be used to place trade orders directly.
Automating Supply & Demand EMA Zones Using Profectus AI
With Profectus, traders can transform the Supply & Demand EMA zones concept into a fully automated module without writing code.
Using Profectus, you can:
- Detect Supply & Demand EMA zones mechanically
- Monitor breaks of zones and creation of new zones
- Use the Supply/Demand EMA zone as an area to take a trade from
- Apply consistent execution rules
This no-code trading approach allows traders to experiment, refine, and deploy institutional concepts in minutes.
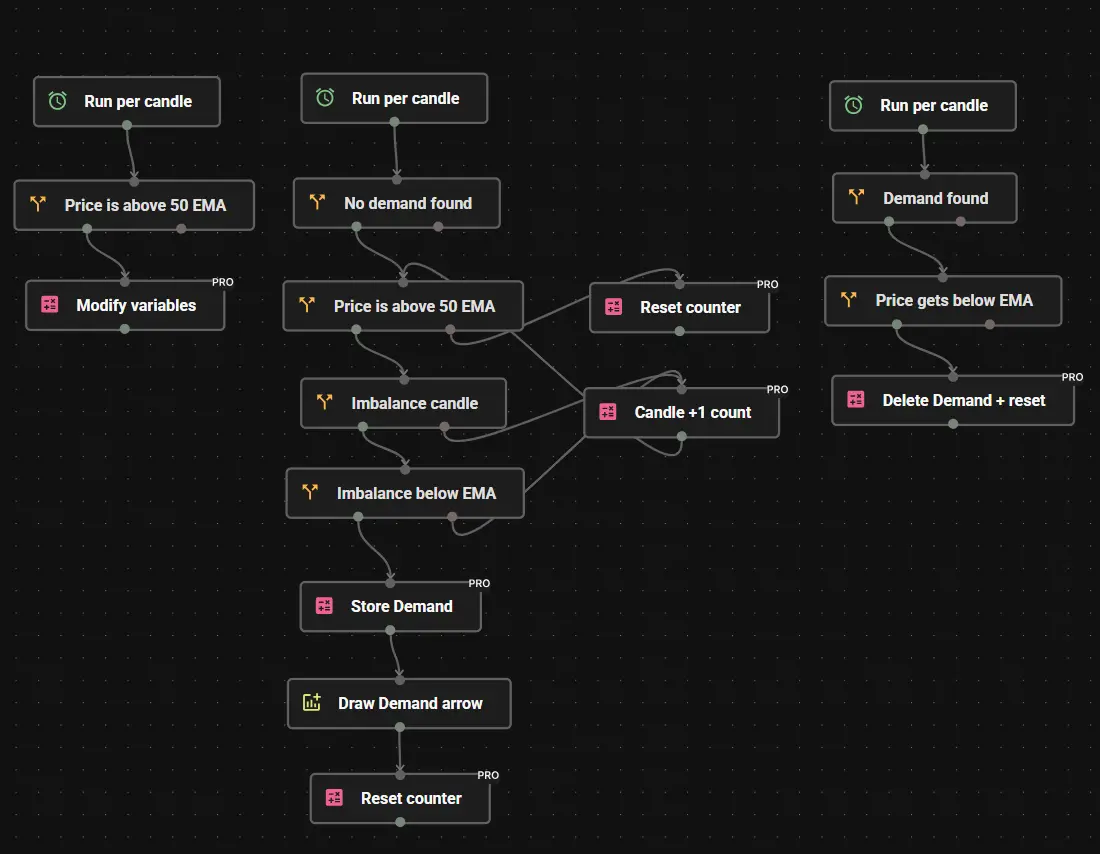
I named the blocks to make it easier for you to understand what we’re doing in each Profectus block. This concept is a bit more complex than the standard S&D zones, but the added EMA element makes it worthwhile to test. We can divide the creation of this no-code EA for Demand EMA zones into 3 steps.
- Identifying the trend change. Using the Run per candle block, we first look to see if we have a break of the EMA. A candle needs to close above the EMA, and the candle's low cannot touch the EMA to confirm the trend change.
- Defining the EMA Demand zone using a loop. We are now introducing a concept used to build more advanced algorithms in Profectus: Loops. A loop is a structure that iterates through all previously formed candles until a certain condition has been met. It can do this in one go using the run per candle block. This particular loop looks if the current candle close is still above the EMA and will search for the first imbalance candle in the past that closed below the EMA.
- Store & Reset the Demand EMA zone price levels. Once the criteria from step 2 have been met, the demand zone is stored on the imbalance candle using a variable. Now the EA remembers where this demand zone is located, and it can reset the zone once the bullish trend is no longer in place.
And that’s it! It only takes a few minutes to drag-and-drop the blocks and build this Demand EMA zone module in Profectus. You can now add an execution module to start taking trades, or add more rules to refine the Demand EMA zone, or add more confluences to the strategy.
👉 Get the S&D EMA Demand Zone Automation Template → S&D EMA Demand Zone Profectus template
Deploying the Strategy as an MQ5 Bot on MetaTrader 5
Once automated, the Demand Zone strategy can be deployed as:
- An MQ5 trading bot
- Running 24/5 on MetaTrader 5
- Executing trades exactly as designed once you add buy/sell blocks and rules
Why MT5?
- Built-in algorithmic execution
- Broker compatibility
- Robust order handling
- Industry-standard platform for automated trading
This allows you to move from manual chart analysis to mechanical automated trading.
Can You Automate Other Smart Money Strategies?
Yes. In our blog library, you can find a selection of automated ICT & Smart Money concepts and strategies.
Have a look at our ICT Order Block Profectus tutorial for example.
If a strategy has:
- Clear rules
- Defined conditions
- Objective execution logic
It can be automated.
S&D Zones are just one example of how institutional trading concepts translate perfectly into algorithmic systems.
Get Access to the EMA Demand Zone Automation Template
Want to see how this EMA Demand Zone strategy works when fully automated?
Access an enhanced automation template used to turn this Smart Money concept into a deployable MQ5 trading bot inside Profectus. This template has a trade execution module included, so you can start testing it right away!
Disclaimer: Templates are for educational purposes only!
👉 Get the S&D EMA Demand Zone Automation Template → S&D EMA Demand Zone Profectus template
Other related blog posts
Dive into a world of knowledge, trends, and industry updates on the Variable blog. Our curated content covers a spectrum of topics.
.png)