Supply & Demand Zones: How to Trade & Automate S&D
Supply & Demand zones can be used as high-probability reaction areas. By defining clear, mechanical rules for zone identification and execution, Supply & Demand becomes a repeatable and testable component of an automated trading strategy.
Why Supply & Demand Zones Matter in Automated Trading
Within Supply & Demand trading, price zones represent some of the clearest footprints of market imbalance and participation by large market players. These zones are not indicators, patterns, or subjective retail concepts — they are areas on the chart where supply or demand has clearly overwhelmed the opposite side, causing price to move away with strength.
The power of Supply & Demand zones lies in the fact that they often mark areas where large quantities of buy or sell orders were executed, leaving behind unfilled orders. When price returns to these zones, the market frequently reacts — either by reversing or by showing clear acceptance or rejection behavior.
However, one of the biggest challenges with Supply & Demand trading is the inconsistency in definition. There are countless variations of how traders identify and draw Supply & Demand zones. Different educators apply different rules, refine zones subjectively, or adjust them on the fly. This often leads to confusion and makes it difficult to apply the concept consistently. In this particular article, we are discussing the most basic S&D version, and we will branch out to other variations in the next articles.
This is exactly why automating a simple, rule-based Supply & Demand zone concept is critical. By defining clear, mechanical rules for zone identification and execution, Supply & Demand becomes a repeatable and testable component of an automated trading strategy.
Since we focus on building automated trading systems for MetaTrader 5, we will refer to these systems as Expert Advisors (EAs) going forward. We’re also specifically focusing on Demand zones in this article.
What is a Supply/Demand Zone
A Supply or Demand zone is an area on the chart where the price moved away impulsively, indicating a strong imbalance between buyers and sellers. Unlike indicators or lagging signals, Supply & Demand zones are price-based structures that highlight where one side of the market clearly overpowered the other.
From a structural perspective, a Supply or Demand zone forms when price consolidates briefly and then departs with strength. This impulsive move suggests that large market participants were active in that area, leaving behind unfilled orders that the market may later return to.
In the case of a Demand zone, we are looking to identify the area where price paused before an aggressive bullish move occurred.
In the case of a Supply zone, we are looking to identify the area where price paused before an aggressive bearish move occurred.
Supply & Demand zones are significant because they often act as:
- Areas of accumulation or distribution
- High-probability reaction zones
- Structural support or resistance
When defined using clear, mechanical rules, Supply & Demand zones become objective areas of interest that can be consistently identified, tested, and automated.
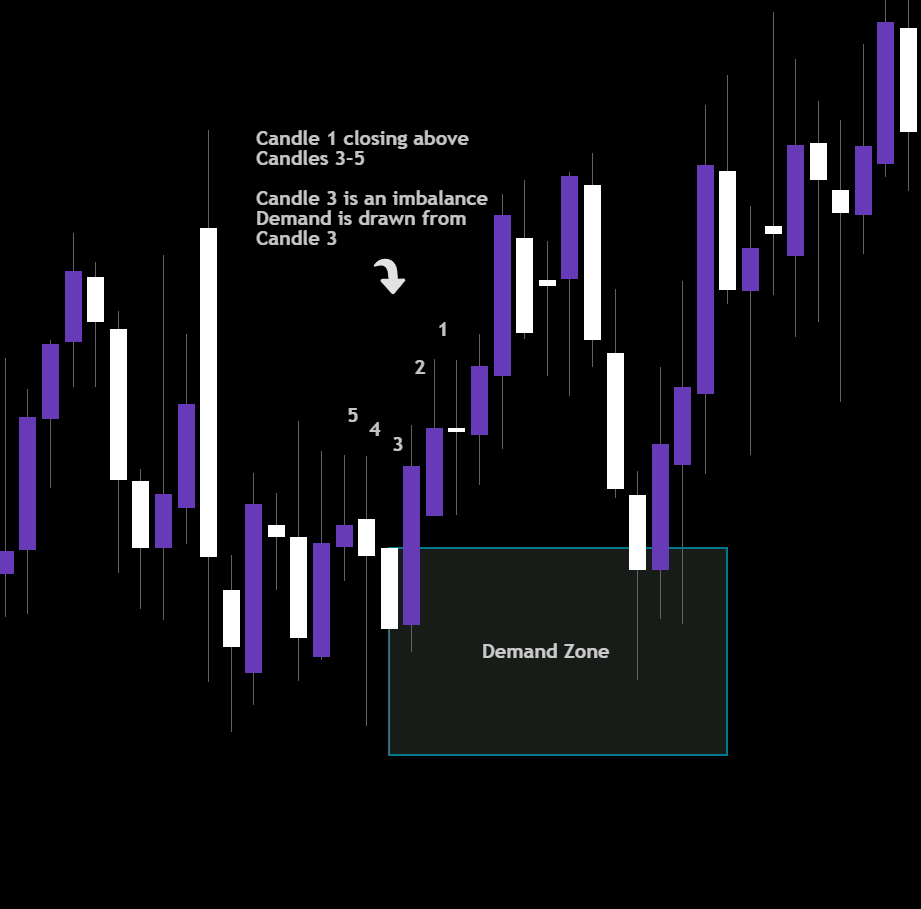
Structurally, a Demand zone is identified by:
- A clear impulsive move in 2 candles
- Identify the last imbalance candle before the impulsive move
- A gap between the high of the imbalance and the impulse candle
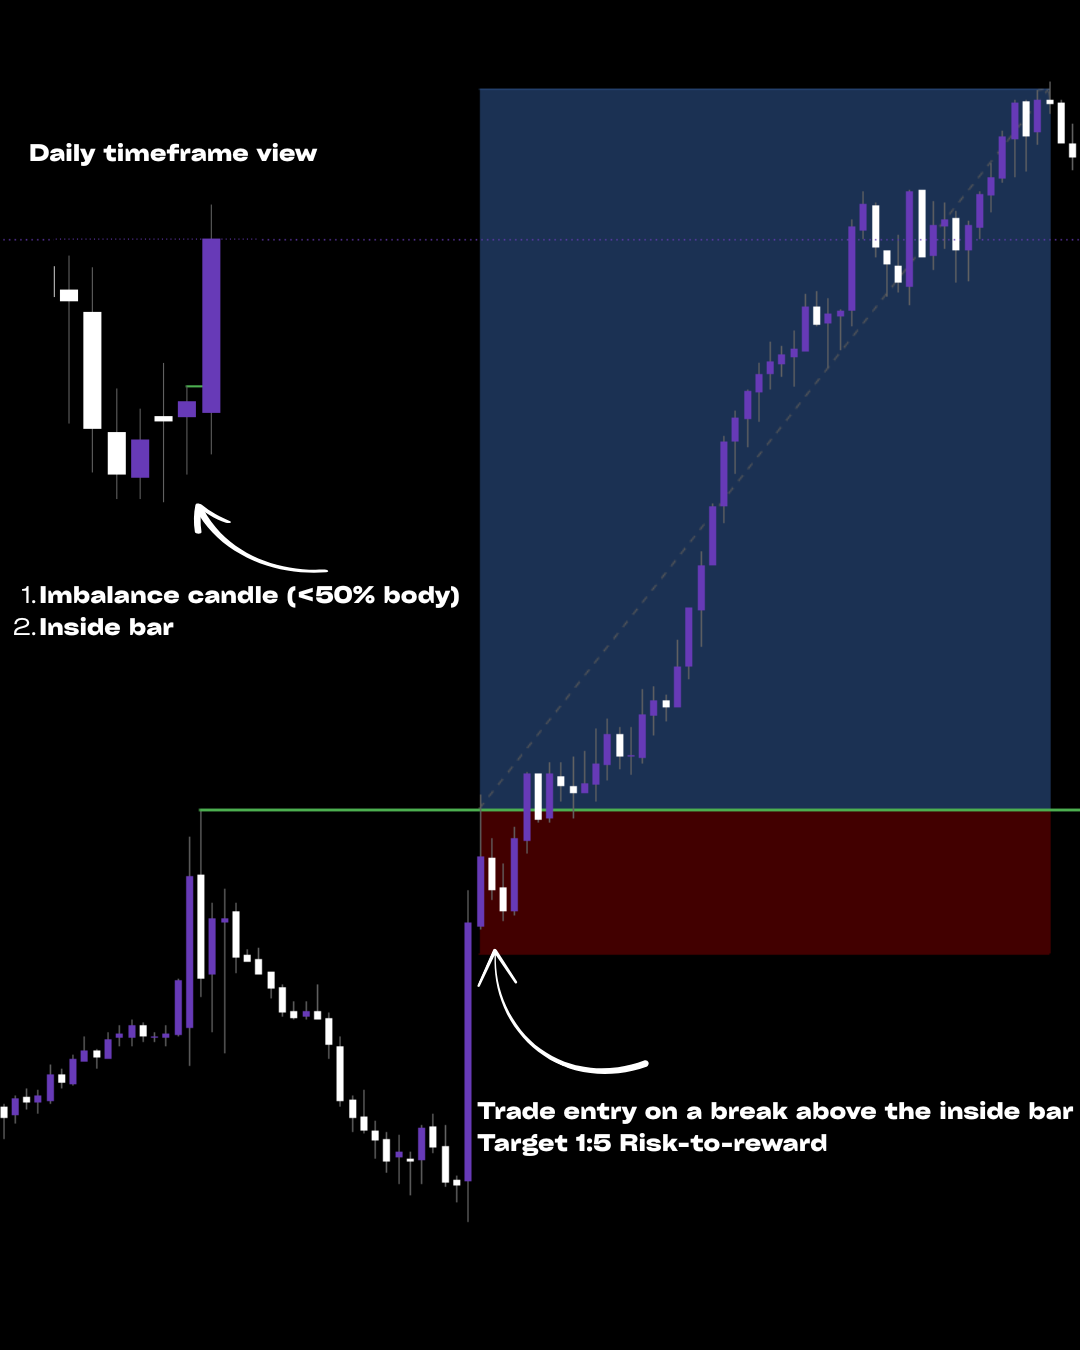
These characteristics make this standard iteration of Demand zones objective zones of interest rather than subjective trade entries. However, on lower timeframes, when stacked with other confluences, Demand zones can be used to place trade orders directly.
How do we define an impulsive move?
To automate the Demand zone, you need mechanical rules for all of the elements. To identify a Bullish Impulsive move, we implemented the following rules in our EA:
- Candle ID 1 (see the screenshot above) needs to close as a bullish candle
- The low of Candle ID 1 cannot touch the high of Candle ID 3
- Candle ID 1 needs to close above the highs of Candle IDs 3,4, and 5
- Candle ID 2 needs to close as a bullish candle
The screenshot above shows the candle ID numbers to help you understand better what these rules actually look like.
Why Supply & Demand zones work (Institutional Logic)
Institutions cannot enter large positions with a single click. They require sufficient liquidity, time, and efficient pricing to build or unwind positions of size. Supply & Demand zones reflect these moments of imbalance, where one side of the market was strong enough to force the price away from a level.
The logic behind Supply & Demand trading is that not all institutional orders are filled during the initial move. As the price accelerates away from the zone, the market reveals where supply or demand overwhelmed the opposite side. When price later revisits these areas, it often reacts — not by coincidence, but because residual buying or selling interest may still be present.
For this reason, Supply & Demand zones can be used as high-probability reaction areas, where price may reverse, consolidate, or show clear acceptance or rejection behavior depending on market conditions.
Automating Supply & Demand Zones Using Profectus AI
With Profectus, traders can transform the Supply & Demand Zones concept into a fully automated module without writing code.
Using Profectus, you can:
- Detect Supply & Demand zones mechanically
- Monitor breaks of zones and creation of new zones
- Use the Supply/Demand zone as an area to take a trade from
- Apply consistent execution rules
This no-code trading approach allows traders to experiment, refine, and deploy institutional concepts in minutes.
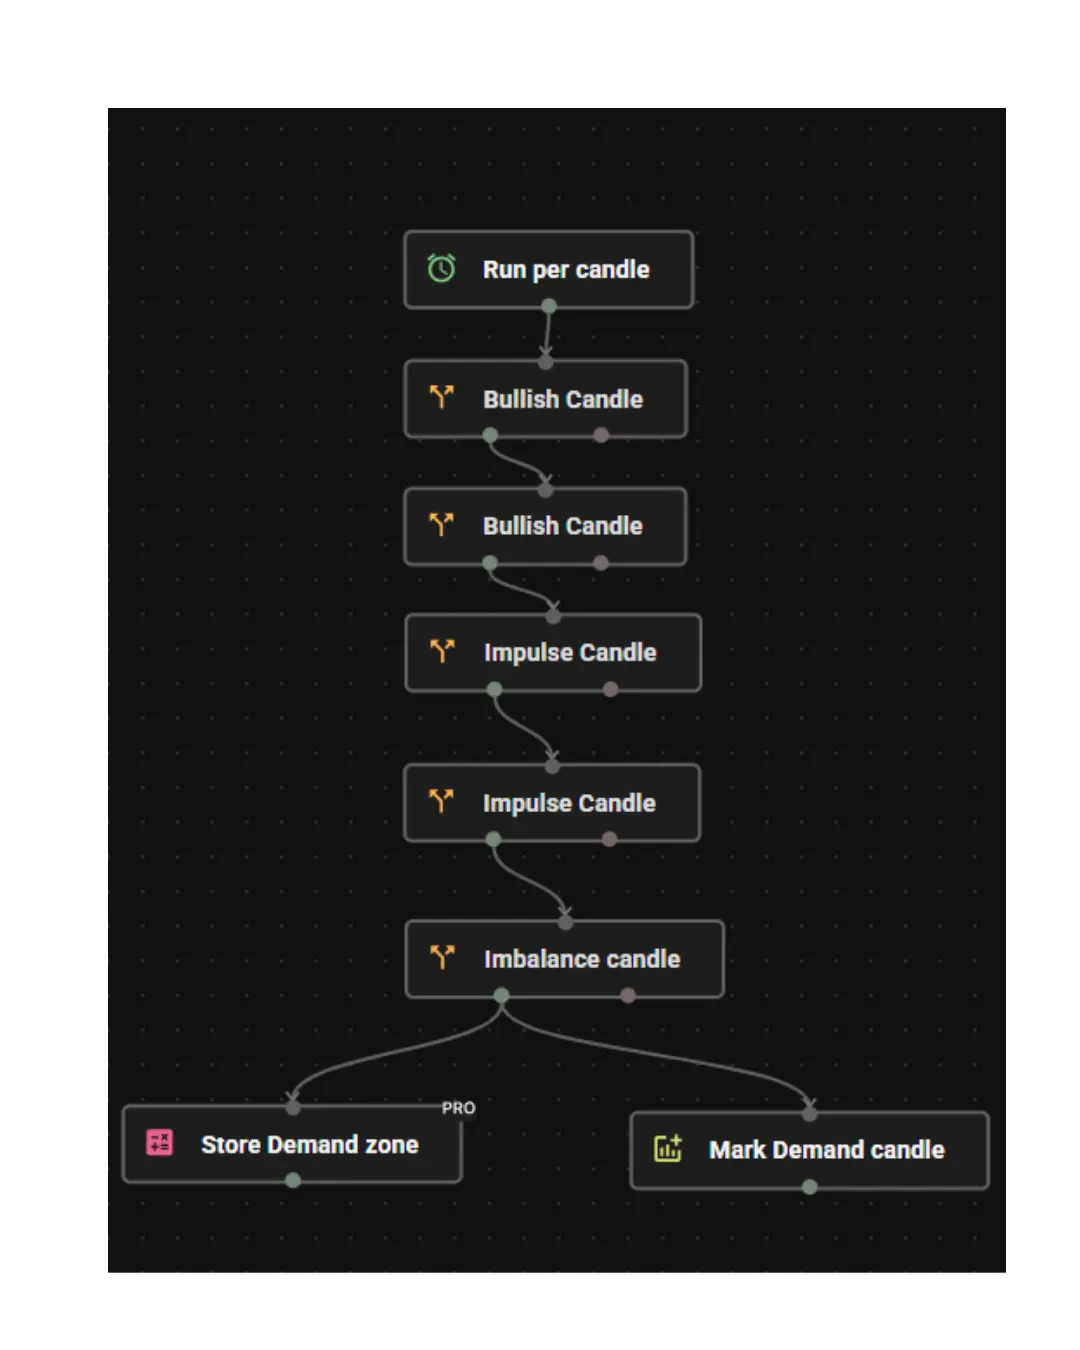
I named the blocks to make it easier for you to understand what we’re doing in each Profectus block. We can divide the creation of this no-code EA for Demand zones into 3 steps.
- Run per candle block. Start with this block to make sure that every new candle that is formed on the chart, the EA runs through the whole process of finding a Demand zone, again and again.
- Defining the Demand zone using Trade Rule blocks. The 5 blocks that follow house the criteria for the Demand zone. We already established that a Demand zone is a 3-candle pattern with:
-Candles 1 and 2 showing impulsive strength
-Candle 3 being the imbalance candle to draw the zone from - Store the Demand zone price levels. Once a Demand zone is found, we store it in a variable so that we can use this variable later to identify if the price comes back to it.
And that’s it! It only takes a few minutes to drag-and-drop the blocks and build this basic Demand zone module in Profectus. You can now add an execution module to start taking trades, or add more rules to refine the Demand zone, or add more confluences to the strategy.
👉 Get the S&D Demand Zone Automation Template → S&D Demand Zone Profectus template
Deploying the Strategy as an MQ5 Bot on MetaTrader 5
Once automated, the Demand Zone strategy can be deployed as:
- An MQ5 trading bot
- Running 24/5 on MetaTrader 5
- Executing trades exactly as designed once you add buy/sell blocks and rules
Why MT5?
- Built-in algorithmic execution
- Broker compatibility
- Robust order handling
- Industry-standard platform for automated trading
This allows you to move from manual chart analysis to mechanical automated trading.
Can You Automate Other Smart Money Strategies?
Yes. In our blog library, you can find a selection of automated ICT & Smart Money concepts and strategies
If a strategy has:
- Clear rules
- Defined conditions
- Objective execution logic
It can be automated.
S&D Zones are just one example of how institutional trading concepts translate perfectly into algorithmic systems.
Get Access to the Demand Zone Automation Template
Want to see how this Demand Zone strategy works when fully automated?
Access an enhanced automation template used to turn this Smart Money concept into a deployable MQ5 trading bot inside Profectus. This template has a trade execution module included, so you can start testing it right away!
Disclaimer: Templates are for educational purposes only!
👉 Get the S&D Demand Zone Automation Template → S&D Demand Zone Profectus template
Other related blog posts
Dive into a world of knowledge, trends, and industry updates on the Variable blog. Our curated content covers a spectrum of topics.
.png)